Showing posts with label Three by Three cards and Post It Notes. Show all posts

Wednesday, August 8, 2012

CardSwaps Treat Yourself Blog Hop


WELCOME  to the Treat Yourself Blog Hop!

There is an awesome crop going on over at the CardSwaps forum on CardMaker's site this week. Challenges and games will be posted August 8-11, 2012 and you have until 11:59PM EST August 14, 2012 to get your projects posted to the appropriate thread. If you haven't participated before, don't worry! There are many members and myself that will be around to offer support and encouragement. You can find out all you need to know in the forum. At the end of the hop, you will be taken to the crop and I do hope you join in. Collect the letters along the way and unscramble them to be entered into the drawing for a prize for one lucky hopper! You will be given details at the bottom of the post. Don't skip ahead!!! 


You should have  arrived here from Jane's  blog, I hope. If not, go back and check out her blog and see the amazing creation she has made especially for this blog hop. While there be sure to leave her some love with a comment and grab her letter that you will need for the Unscramble It game.
The blog hop "theme" goes with the crop title of "Treat Yourself". The type of project was left  up to the hostesses of the blog hop, as long as it somehow conveyed a way the hostess "treats" herself. We were also asked to share something about a way we unwind or our favorite way to treat ourselves. I had to think about that for awhile as I wasn't sure how I really treated myself to be honest. Then I thought about time with the "girls". I have 4 friends whom I have known for years and have remained close to in spite of our busy  hectic schedules of work and raising kids. We manage to schedule some girl time together now and then which usually means a lunch or dinner date followed with maybe some shopping or seeing a movie. This brings me to my project...

I really didn't have anything stamp wise or image wise that I could use to show time out with the girls so I knew I would have to think outside the box for this one! Then I remembered something that occurs just about every time we get together for lunch or dinner. A couple of years ago the 5 of us decided to try a new restaurant for our girls night out dinner. Once the waitress took  our drink order she set some coasters down in front of each of us and said she would be right back with our drinks. My eyes zeroed in on those chipboard coasters and I immediately started thinking of all the things I could make with them. I started snatching them up as I was telling my friends what all I could do with them. When the waitress returned, you could tell she had a puzzled look on her face as if she was trying to remember if she had set down coasters already or not. That's when one of my friends spoke up and let her know she wasn't going crazy but that I had taken them and put them in my purse to take home to craft with. I sat there waiting for the coaster police to come out and take me away , when to my surprise the waitress said, "I do the same thing! Here have some more." She reached into her pocket and pulled out a big stack that she handed over to me. From that time on when we meet for lunch or dinner, my friends are grabbing up their coaster and handing them over to me!

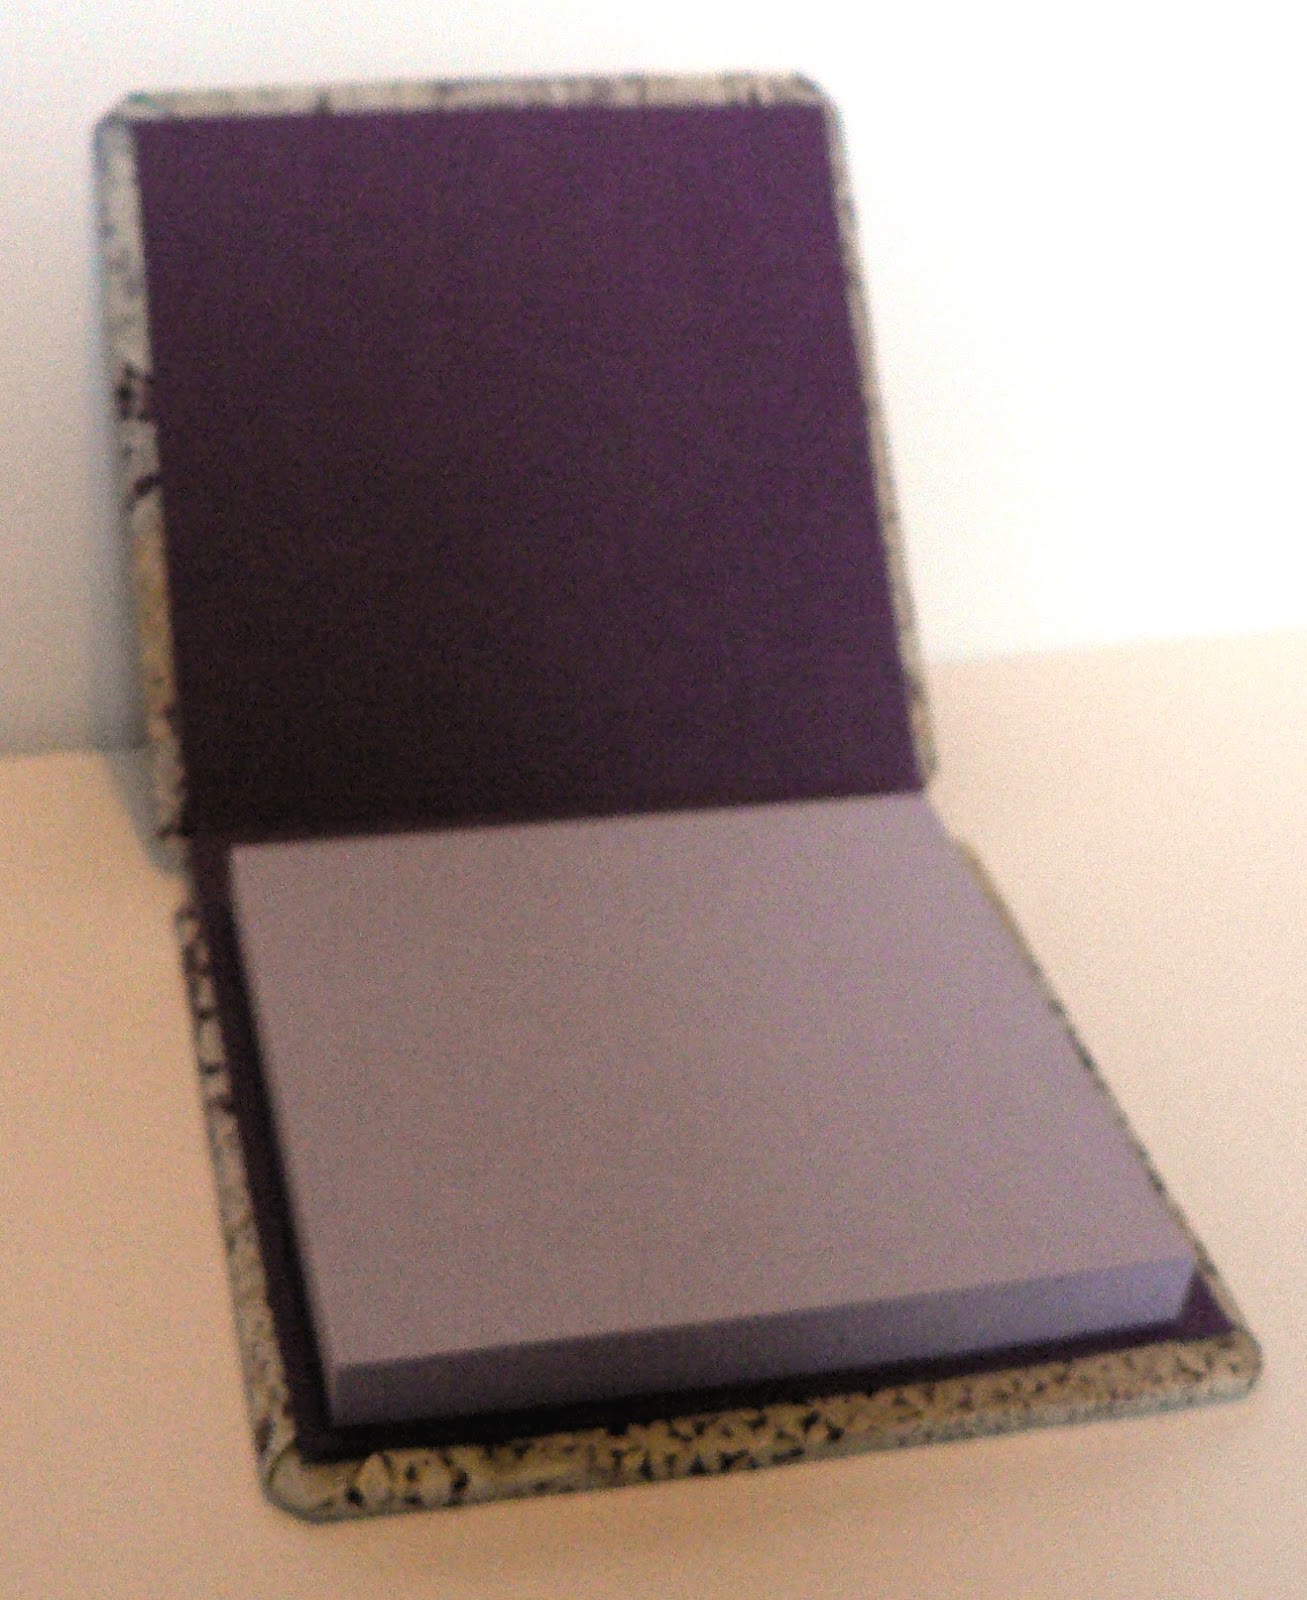
Well those coasters have been sitting on a shelf in my craft room collecting dust so I decided it was time to finally use some of them for this blog hop. I made a post it holder using a coaster for the base and one for the top. In fact just this past week I was treating myself to a luncheon with the girls so I made one for each of them. The one I have pictured here was made using a Spellbinders butterfly. I cut the butterfly out of the piece of DP used to cover the top and then repositioned the butterfly to look as if the butterfly just came right out of the paper. I used some Lumiere paint to paint the coaster so that the printing of the coaster would not show through where I cut the butterfly out. The basic design of the post it note holder is not my own original idea but is from someone I follow on you tube. You can find her directions HERE if you would like to make one of your own. 


Supplies I used:
2 chipboard 3 1/2" square coasters
Designer Paper & Cardstock
Elmer's Rubber Cement Glue
Score Tape
Spellbinder's Butterfly die
Sizzix Leaf Branch die
Lumiere Pearl White Paint
Colorbox Lavender pigment ink
Pearls from my stash

Unscramble It game for hoppers... You will be unscrambling a word once you have collected a letter at each blog you visit. The hostesses can play along, because they don't know any of the letters but their own. Once you collect ALL the letters, the last hostess (Lora) in the blog hop will direct you to the thread in the forum where you can find all the details you need to enter the drawing. All hoppers collecting all the letters, unscrambling the word or phrase, entering the game by following the directions in the forum, and leaving feedback on EVERY blog in the hop WILL be entered into a random drawing held on August 15, 2012. ONE lucky hopper will have their name drawn and will win a prize!! Fun, right?? The winner will be posted in the forum on the game thread for Treat Yourself Unscramble It! So, make sure you visit every blog and find the letters. Your hints are... it’s a phrase, it has three words, and it’s a way to keep balance in one's life.

My letter is...
i

Now, be sure to hop on over to Margaret's blog next to see what she has created and to collect your next letter. Hope to see you over at the crop joining in on all the fun with the challenges and games!

The list of hoppers, in case you got lost somewhere on the hop:

Brooke Smith (CardMaker Blog)   :   http://www.cardmakermagazine.com/blog/
Jane   :   http://jane-notsuchaplainjane.blogspot.com/
Susan   :   http://lilbitofme-susan.blogspot.com/
Margaret      http://mmora-lilyana-365.blogspot.com/
Trudy Sjolander   :   http://truesgiftsfromtheheart.blogspot.com/
Golda   :   http://goldapete.wordpress.com/
Meredith   :   http://whatsnextma.blogspot.com/
Jeanette   :   http://jeanette9677.blogspot.com/
Colleen Schaan   :   http://www.distinctivetouches.com/
Laura   :   http://ljjonescircus.blogspot.com/
Ivanka   :   http://ivankascardstudio.blogspot.com/
Marlene   :   http://www.marlenescubbyholecreations.blogspot.com/
Anya Schrier   :   http://aschoss.blogspot.com/
Angelina   :   http://angel-artdesign.blogspot.com/
Ana   :   http://anaggarciam.blogspot.com/
Ashley   :   http://www.stampingwithashley.blogspot.com
Lora   :   http://www.lorabrinkman.com/

Friday, May 4, 2012

3x3 Cards

A quick post to get myself updated on my blog. I've been neglecting things here on my blog lately and not posting my projects...sorry about that! These are some more 3x3 cards. The Asian ones were made for the February crop on the Card Swaps forum over at CardMakers. We were to make 4 3x3 cards along with a holder for them. We had a specific holder that we had directions for to make. It went together really fast and easy. The holder holds 4 3x3 cards with envelopes very nicely. There is also a middle section for holding a small pen or stamps. I made mine with a clear acetate top. It would make a nice gift for someone.
I also recently hosted a swap for 3x3 cards and here are a couple of the ones I made.
Both have embossing on them but I had a really difficult time getting a good photo that would show the embossing.

This last 3x3 was made to look like the quilt block the Ohio Star.


Thanks for stopping by. I will be back in just a bit with my project for this week's challenge at Card Swaps.

Tuesday, March 6, 2012

Quilt Cards

Hello! I just realized that I never posted any of my cards from the online card crop last month over at Card Swaps. Geez Louise, you would think I was getting old and losing my mind :) I hosted two of the 12 challenges for the card crop. One of my challenges was to create a card using any quilt design of your choice. I use to love quilting. Going through all my quilt books and patterns I found many that I thought could be used for making cards. I chose to do a variation of the nine patch for my card samples. I made a 5x5 square card, a 3x3 card and a size A2 card all using the same pattern.

I also included a tutorial for making this super easy and quick pattern for anyone who wanted to try my challenge using this quilt block pattern. Here is the tutorial if any of you would like to try it too.
Directions:
You will need 5 squares and then a 6th square that is cut into fourths to create 4 triangles. You will also need a base that is square in shape and 3 times the size of one of your squares. So if you are cutting 1" squares then your base will be 3". In all my cards above I used a solid color for my base and two different pattern papers for my squares. You may use the same or come up with your own combination of different patterned papers. For the sake of the tutorial though I only used two colors. You may cut your squares with a paper punch, dies, trimmer...your choice. Here's the pieces you need to start with. I made 1" squares for the tutorial with a 3" base.
 The next picture shows you how to cut the four triangles. Cut the square in half then cut the two halves in half.
 Using your favorite choice for adhesive...place one square in each corner of your base...one triangle between each square and then the last square in the middle.


Pretty easy! Now you can mat and embellish your quilt square to your liking and use on your card as you see fit.

For my square card I used 1 1/4" squares. For the 3x3 card I used 3/4" squares. On my A2 size card I made 4 quilt blocks using 1/2" squares for all. The designer papers are by Basic Grey and the cardstock is Bazzill.

Hope you enjoyed my quilt cards and thanks for stopping by!


Tuesday, February 21, 2012

Punch Art

This week I am the host for the weekly member challenge over at CardMakers Card Swaps forum. The challenge I chose to host is "Punch Art". When my obsession started with paper crafting years ago, I found that I loved punches! Big punches, little punches, shape punches and now all the wonderful border punches.....love them all. And what better way is there to get further use out of your punches than to create some punch art!

For my examples for the challenge I made 3x3 cards. The first one I made a ladybug using different size circle punches.

For the next one, the baby bib, I used a scallop punch, a circle punch and an oval punch to cut the neckline. Cute huh?

The last one, which is also my favorite, was made using different size circle punches and SU's ornament punch. The chocolate sauce is made by using the negative part of a scallop punch. I used a white pen for making the sprinkles then I added Diamond Glaze to help make the sauce look rich and chocolatey!

I can't take credit for these designs. I googled "punch art" and found oodles of designs! Instructions and credit for the ice cream sundae can be found HERE, the ladybug HERE and my apologies as I do not remember where I found the instructions for the baby bib. If you would like instructions though on how to make the bib, just let me know and I will be happy to post them.

Thanks for stopping by and I hope you enjoyed my punch art. If you haven't checked out my prior post to this one..."A Card Request"...please do and please consider sending a card. Your card can help put a smile on a child's face. Thanks!

Wednesday, February 8, 2012

Winter Warm Up Blog Hop / CardSwaps

WELCOME!

You are on the CardSwaps Winter Warm Up Blog Hop! There is an awesome card crop going on over at CardSwaps with challenges, games and prizes. Which I will tell you about in just a second. I want to first let you know now that there is also a fun game on the blog hop which I will also tell you about in just a moment. So don't miss a thing....pull up a chair and read on!

First things first...here is the info about the card crop. Challenges and games will be posted February 8-11, 2012 and you have until February 14, 2012 to get your projects posted to the appropriate thread. If you haven't participated before, don't worry! There are many members  that will be around to offer support and encouragement. You can find out all you need to know in the forum. So... AFTER the hop... you will be taken to the crop and I do hope you join in. Prizes for each of the challenges will be given out as well as there will be one grand prize winner! Details for joining in and winning prizes are on the site. 

Onto my project! The theme for both the card crop and blog hop is "Winter Warm Up". When I think of warming up I think of having one of my favorite hot drinks! So for my project I made coffee cup cards. I have been seeing coffee cup cards on the internet that hold a gift card to a favorite coffee shop and thought they were cute. Then I saw where someone had made 3 x 3 cards in the shape of a coffee cup and just couldn't resist making some of my own. I thought they would be perfect to have on hand to add to little gifts that I like to give to the host of swaps that I like to join. Here's my card:

I used some basic supplies...cardstock, a crimper, ink and adhesive to make the little card. Took just minutes! What's that you say? Doesn't look like a 3x3 size? Well your right. I came out of the shower one day to find my son sitting in my craft room with a big smile on his face. He had added  steam to all my coffee cups! He was so proud that I didn't have the heart to tell him that they would no longer fit in a 3x3 envelope. I think they are cute too with the steam so I left them and they will still look cute attached to a hostess gift with a little note inside. If you would like to see where I got my inspiration to make these and for directions...click HERE.

Now onto the game details for the hoppers. You will be unscrambling a word once you  collect a letter at each blog you visit. The hostesses can play along, because they don't know any of the letters but their own. Once you collect ALL the letters, the last hostess in the blog hop will direct you to the thread in the forum where you can find all the details you need to enter the drawing. All hoppers collecting all the letters, unscrambling the word or phrase, entering the game by following the directions in the forum, and leaving feedback on EVERY blog they visit WILL be entered in to a random drawing held on February 15, 2012. ONE lucky hopper will have their name drawn and will win a prize!! Fun, right?? So, make sure you visit every blog and find the letters. Your only hints are... it's a phrase and it's a way papercrafters warm up.


OK... You arrived here from Lora's blog, I hope. If not, go back and check out her blog for her awesome creation and collect your letter. Then collect my letter and hop on, my friend.


My letter is... A


The list of hoppers, in case you get lost:

Your next stop is Laura who I know will have an awesome project to share with you. So hop on over to her blog and all the others for fun and inspiration. Hope to see you after your through hopping over at the card crop!

Tuesday, October 12, 2010

A Challenge...A Swap... A Project


Wow...has it really been a couple of weeks since I posted last? I had that flu bug that has been going around and it sure set me back a bit as well as I have just been busy with life. But I have managed to fit in a bit of crafting time here and there. A couple of weeks ago was World CardMaking Day and over on the CardSwaps forum on the CardMakers site there was a mini crop challenge. One of the challenges was to make a 3"x 3" notecard. Above is the one I made for the challenge. It was quick and easy to make and the best part was I used scraps from my scrap pile to make it. This was one of my favorite challenges from the mini crop. Also being the favorite of some of the other girls as well, one of the site participants chose to host a swap for making 3"x 3" notecards. I couldn't pass that up! So I rummaged through my scraps, used the same design as my challenge notecard...adding a tweak or two, and made 16 more notecards. Here is what I came up with for the swap:

Twelve of the cards are for the swap but four are for myself. Sooooo that meant I needed something to keep my set of notecards in as well as the ones I will receive in the swap. Hence the project part of this post and this is what I came up with....a box to hold my cards:


You can find a tutorial here on SCS that shows how to make this box. It was so simple and so fast to make. I already have ideas in my head about making more to give as gifts.

Hope all of you have managed to avoid that nasty flu bug that is going around. Stay well my crafty friends and be sure to keep an eye on my blog for news about the upcoming "Sugar Crash" Crop Challenge and Blog Hop that will be happening November 4th - 6th over on the CardSwaps forum. Lots of challenges, prizes and loads of fun will be going on. I will be once again one of the blog hop stops and I have a fun project that I will be showcasing.

Thanks for stopping by!

Thursday, January 28, 2010

Post It Note Holder


Thought I would take a break tonight from making cards and make a Post It Note holder to hold the 3" x 3" note size. I started with a piece of cardboard about the thickness of a cereal box cut to the size 3 1/8" x 8". I chose to use origami paper with a pretty Asian print to cover my holder. I cut the outside piece 3 7/8" x 8 7/8" and the inside piece 3" x 7 7/8". I then scored the cardboard, starting from the left side, at 6/8", 1 2/8", 4 3/8" and 4 7/8". Fold along all the score lines and crease well with bone folder. I then coated the wrong side of the outside piece of paper with Elmer's No Wrinkle Rubber Cement and applied to the cardboard piece. Fold in all four corners and then each adjacent side. I then applied the inside piece after applying glue to it's wrong side.

I cut two pieces of a thin magnet sheet each measuring 5/8" x 2 3/4" and applied to the flap of the holder.

I wanted to keep to a simple but elegant look so I chose not to over embellish....something I have a tendency to do. I made a tassel from embroidery floss and added a dragonfly charm. I thought this was just enough embellishment letting the paper be the main focus of the holder.

I then used double sided tape to attach my post it note pad to the inside. The magnets keep it closed but yet easy to open when ready to use.


Here are some pieces I have cut for a second holder. This was quick and easy to make and a lot of fun. Wish I would have thought of these before Christmas!

Thanks for stopping by.