Thursday, April 25, 2013

Balloon Birthday Card

A quick and simple birthday card...but I think a cute one! Hope you agree. The balloons are a punch, the happy letters are dies by Sizzix and the birthday part of the sentiment is computer generated. Printed paper is by DCWV and cardstock by Bazzill. The border punch is by Fiskars.

Thanks for stopping by!


Monday, April 15, 2013

Coin Envelope Mini Tag Book / Accordion Tag Book

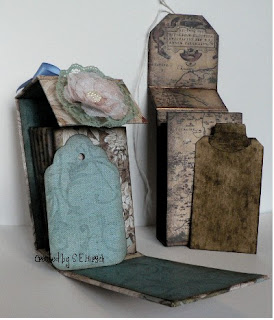
Three posts in one day! I know! That is a lot for me. I wanted to post one more style of a tag book / mini album that uses coin envelopes to create an accordion style. The tutorial is by Christina Betts. You can find part one HERE and part two HERE. I made my own coin envelopes and if you would like to know how I made mine...check out my earlier post HERE. I used Lumiere Paints in copper to paint my edges of the chipboard and then distressed the edges with walnut and black soot Distress ink by Ranger. I used Kraft cardstock to make my coin envelopes and the designer paper is by 7 Gypsies. I have not completed my tags yet but I will be sharing those at a later date when I do. This is really a super easy and fun project. I hope you will check out the tutorial!

An inside view:


In case you missed my earlier post...here is a couple of views of this tag book and the vertical toilet paper roll tag album that I posted earlier.

 Thanks for stopping by!

Sunday, April 14, 2013

Vertical Toilet Paper Tag Mini Album

 I love to make tags and what could be better than a collection of tags in a cute tag album! This is a vertical toilet paper roll tag album that uses an incredibly easy hinge system and toilet paper rolls.  I used a medium weight chipboard, designer papers by K&Company and a handmade flower from a swap I was in. I have cut my tags  from chipboard and both sides have designer paper on them but I still have some more to do to the tags and will have to share those at a later date. I think I may be doing some more embellishing as well to the inside of the album. Meanwhile, you should check out Ginger's (mysisterscrapper) awesome tutorial on how to make the vertical toilet paper roll album. You can find the tutorial HERE for part one and HERE for part two. Her tutorials are well done and so easy to follow. She does some amazing work and creates some beautiful mini albums. I hope you check out her tutorial.
Here is an inside view of the album:


Thanks for stopping by!


Tutorial For Making A No. 3 Size Coin Envelope

 From time to time I find myself needing a coin envelope for a project I am making. Instead of purchasing them, I like to make my own. Making my own allows me to make the coin envelope in any solid color cardstock or designer paper of my choice. The size Number 3 coin envelope is the size I use most often. I thought I would share with you how I make mine. Pictured above is one with a closing flap and one without.

Instructions:
Using cardstock or designer paper of your choice...
Cut a 6" x 6" square
On one side score at 1/2" and 4- 3/4"
Turn your 6 inch square once (90 degrees) and score at 1- 1/2" and 4"
You will now be making 4 cuts. View the photo below to see where you will be cutting.
Basically  you are cutting away the four corners up to where the score lines meet at each corner. Once you have cut away your pieces your 6" square should now look like this:

The larger tab at the top is your flap and the smaller one at the bottom is the tab that will enclose the bottom of your coin envelope. You will notice that on the bottom tab I cut off the edge at an angle to make it easier for the tab to fold up and to give a neater look to your finished envelope. Now fold on all 4 score lines. Apply adhesive to the longer side flap and seal down over the other folded side flap. Apply adhesive to the bottom tab and fold up. I like to use a liquid adhesive for this but double sided tape also works well. Round the corners of the top flap if you like. You can also take a round circle punch and cut a half circle on the top of your coin envelope with the flap open if you like. I used a one inch circle punch on mine. You now have a number 3 size coin envelope which measure 2 -1/2" x 4- 1/4" when completed. Easy Peasy!

Need a coin envelope without the flap? No problem! Cut your paper to be 4-3/4" x 6".
Score at 1/2" on the 4- 3/4" side and score at 1-1/2" and 4 " on the 6" side.
Cut your two corners out from the bottom tab as directed above. Notch your bottom tab on each side of the tab, fold on the score lines, glue your side tabs together and then your bottom tab and notch the top with a circle punch if you like.

Hope this helps you to make a number 3 size coin envelope. Thanks for stopping by!