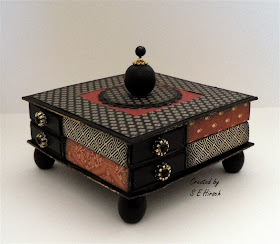
I had fun this weekend with altering little matchboxes!
First I started with 8 of these...
I painted the drawers with Jacquard's Neoopaque black acrylic paint. I love this line of paint when painting on chipboard or cardstock as it does not warp or wrinkle the chipboard / paper. I then covered the outside of the matchboxes with Graphic 45's Couture paper collection.
Hmmm....I worked on the above photo...rotated it,,,,it still keeps inserting into my blog post in the wrong direction. So turn your head to the right a bit and you will see the photo correctly. :) I used the 6x6 pad for the solid part of my project, the 8x8 to cover the matchboxes and the 12x12 for the inserts inside each drawer.
I then cut two pieces of medium weight black chipboard (by Graffix) into 3 3/4" squares. I rubbed on some Inka Gold by Viva Decor on the edges of the chipboard pieces. Not a lot but just enough so that it showed and looked aged as if the gold had rubbed off some throughout the years. I also used Black Soot Distress Ink by Ranger to edge all my papers.
The handles on my drawers are made by using a jewelry spacer with a black brad. The feet were made using these beads from my stash. Looks like something that might have been used in the 70's judging by the color and the size of the hole in the beads.
I took some light weight spackle to fill in the holes so that I would have enough of the bead to attach to the bottom of the chipboard. Every craft room should come with a jar of spackle! :) Once the spackle dried, I painted each bead with the same black paint that I used to paint my drawers.
I assembled all the pieces using Scotch Quick Dry Adhesive. The matchboxes are stacked two high and sandwiched between the two chipboard pieces. Then I glued the feet on using my hot glue gun. The beaded design on the top was made using a 3" stick pin, one of the green beads that I painted black, a gold jewelry spacer and a gold bead. When the boxes are all placed on the base chipboard piece, it leaves a hole in the middle where none of the boxes touch. So my stick pin runs all the way through the top and through the bottom chipboard piece. This left me just enough of the stick pin sticking out that I could attach a small rubber tip which now holds the stick pin in place.
Here are some different views of my finished project. Each side is a bit different as I used at least one different print on each side.
Here is a view with 4 of the drawers opened:
The box kind of has an Asian flair to it, don't you think? I'm calling it< "Couture goes Asian"! :)
I hope you enjoyed my altered matchboxes. Thanks for stopping by!


This is so very cool, but then you work normally is!
ReplyDeleteAwesome box Susan...
ReplyDeleteIt turned out really nice.
Well done